LVM은 리눅스커널에서 논리적으로 볼륨을 관리하는 것을 말한다.
뭐... 우리가 이론은 각자 공부하는 것으로 하고
디스크 확장을 위한 한가지 방법이라고 생각 하고 생성해 보겠습니다.
기본 베이스틑 proxmox 에서 진행 하였으며

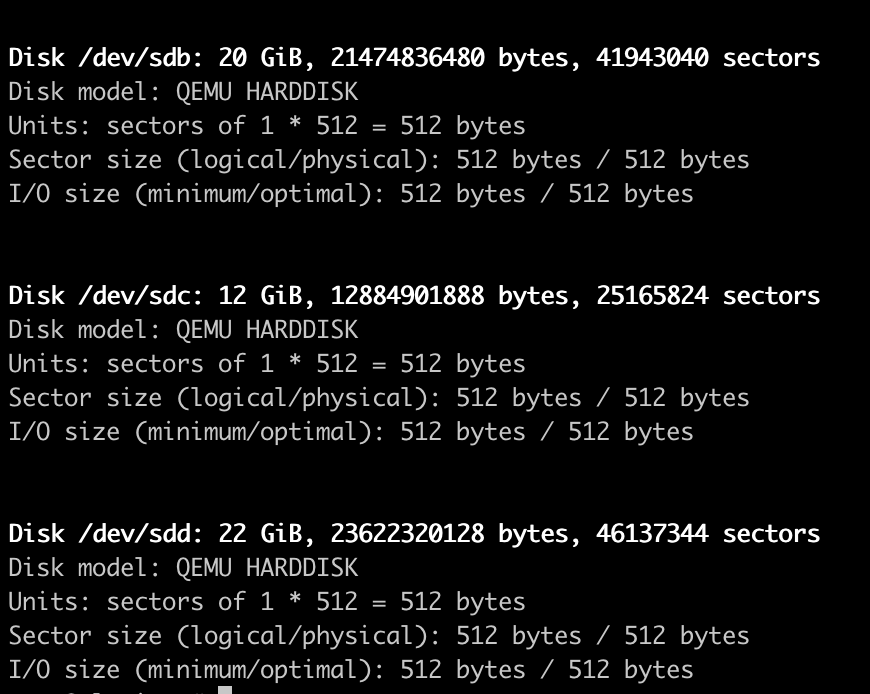
요렇게 20G disk 한개와 12G disk 한개 22G disk 한개를 마들었습니다.
fdisk 로 확인해 보면 아래와 같이 disk를 확인 할 수 있습니다.
그럼 위의 3개의 디스크를 가지고 하나의 볼륨 그룹을 만들어 보겠습니다.
아래와 같이 3개 모두 진행해 줍니다. /dev/sdb, /dev/sdc/, /dev/sdd
fdisk /dev/sdb
Welcome to fdisk (util-linux 2.34).
Changes will remain in memory only, until you decide to write them.
Be careful before using the write command.
Device does not contain a recognized partition table.
Created a new DOS disklabel with disk identifier 0xda7524f6.
Command (m for help): n
Partition type
p primary (0 primary, 0 extended, 4 free)
e extended (container for logical partitions)
Select (default p):
Using default response p.
Partition number (1-4, default 1):
First sector (2048-41943039, default 2048):
Last sector, +/-sectors or +/-size{K,M,G,T,P} (2048-41943039, default 41943039):
Created a new partition 1 of type 'Linux' and of size 20 GiB.
Command (m for help): t
Selected partition 1
Hex code (type L to list all codes): l
0 Empty 24 NEC DOS 81 Minix / old Lin bf Solaris
1 FAT12 27 Hidden NTFS Win 82 Linux swap / So c1 DRDOS/sec (FAT-
2 XENIX root 39 Plan 9 83 Linux c4 DRDOS/sec (FAT-
3 XENIX usr 3c PartitionMagic 84 OS/2 hidden or c6 DRDOS/sec (FAT-
4 FAT16 <32M 40 Venix 80286 85 Linux extended c7 Syrinx
5 Extended 41 PPC PReP Boot 86 NTFS volume set da Non-FS data
6 FAT16 42 SFS 87 NTFS volume set db CP/M / CTOS / .
7 HPFS/NTFS/exFAT 4d QNX4.x 88 Linux plaintext de Dell Utility
8 AIX 4e QNX4.x 2nd part 8e Linux LVM df BootIt
9 AIX bootable 4f QNX4.x 3rd part 93 Amoeba e1 DOS access
a OS/2 Boot Manag 50 OnTrack DM 94 Amoeba BBT e3 DOS R/O
b W95 FAT32 51 OnTrack DM6 Aux 9f BSD/OS e4 SpeedStor
c W95 FAT32 (LBA) 52 CP/M a0 IBM Thinkpad hi ea Rufus alignment
e W95 FAT16 (LBA) 53 OnTrack DM6 Aux a5 FreeBSD eb BeOS fs
f W95 Ext'd (LBA) 54 OnTrackDM6 a6 OpenBSD ee GPT
10 OPUS 55 EZ-Drive a7 NeXTSTEP ef EFI (FAT-12/16/
11 Hidden FAT12 56 Golden Bow a8 Darwin UFS f0 Linux/PA-RISC b
12 Compaq diagnost 5c Priam Edisk a9 NetBSD f1 SpeedStor
14 Hidden FAT16 <3 61 SpeedStor ab Darwin boot f4 SpeedStor
16 Hidden FAT16 63 GNU HURD or Sys af HFS / HFS+ f2 DOS secondary
17 Hidden HPFS/NTF 64 Novell Netware b7 BSDI fs fb VMware VMFS
18 AST SmartSleep 65 Novell Netware b8 BSDI swap fc VMware VMKCORE
1b Hidden W95 FAT3 70 DiskSecure Mult bb Boot Wizard hid fd Linux raid auto
1c Hidden W95 FAT3 75 PC/IX bc Acronis FAT32 L fe LANstep
1e Hidden W95 FAT1 80 Old Minix be Solaris boot ff BBT
Hex code (type L to list all codes): 8e
Changed type of partition 'Linux' to 'Linux LVM'.
Command (m for help): w
The partition table has been altered.
Calling ioctl() to re-read partition table.
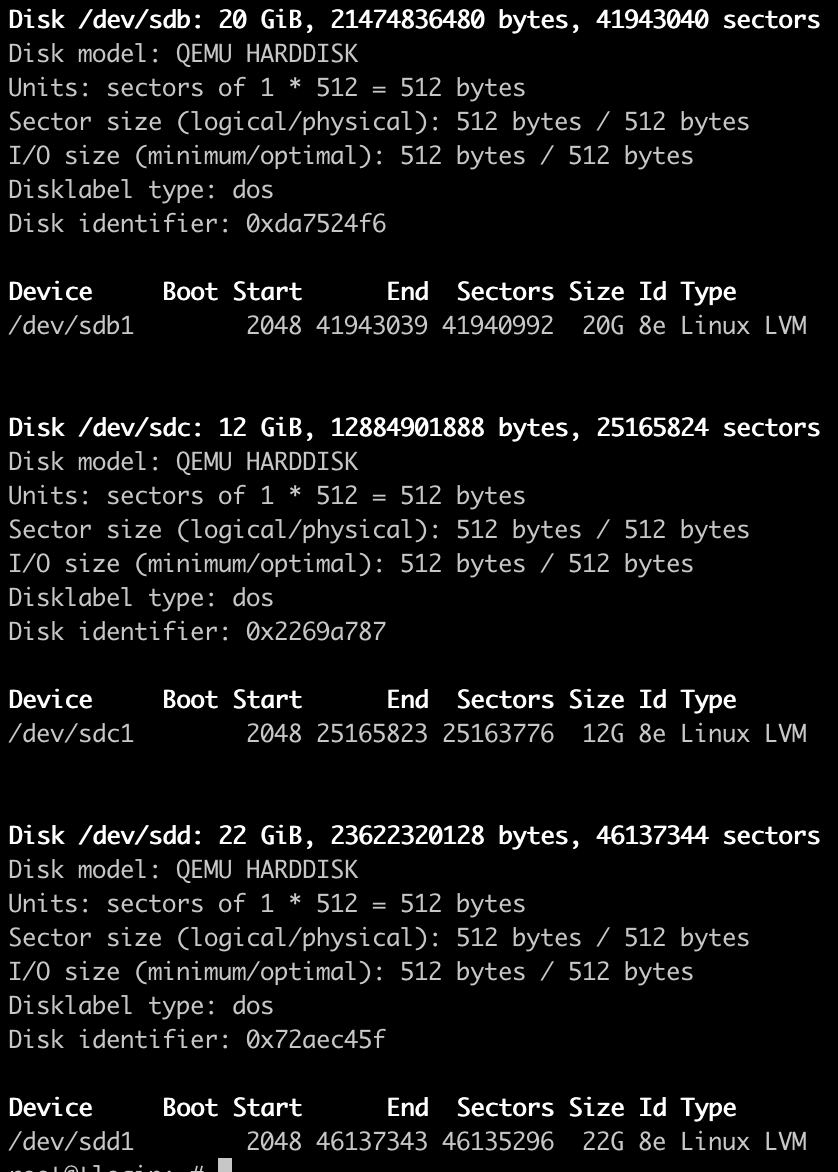
Syncing disks.이전과는 다르게 아래와 같이 Type 이 Linux LVM으로 변경 된 것을 보실 수 있습니다.
그럼 이제 Physical volume 을 만들어 보겠습니다.
# pvcreate /dev/sdb1
  Physical volume "/dev/sdb1" successfully created.
# pvcreate /dev/sdc1
  Physical volume "/dev/sdc1" successfully created.
# pvcreate /dev/sdd1
  Physical volume "/dev/sdd1" successfully created.
이렇게 physical volume 을 만들고 나면 이제 volume group 를 만들어 주고 volume group 안에 위에 Physical volume을 넣어 줄 것입니다.
// vgcreate [볼륨그룹 이름] [디스크 파티션]

# vgcreate tedVG /dev/sdb1 /dev/sdc1 /dev/sdd1
  Volume group "tedVG" successfully created
이제 vgdisplay 로 확인해 보겠습니다.
# vgdisplay
  --- Volume group ---
  VG Name               tedVG
  System ID
  Format                lvm2
  Metadata Areas        3          // 3개의 디스크가 LVM으로 생성된 것을 확인 할 수 있습니다.
  Metadata Sequence No  1
  VG Access             read/write
  VG Status             resizable
  MAX LV                0
  Cur LV                0
  Open LV               0
  Max PV                0
  Cur PV                3
  Act PV                3
  VG Size               <53.99 GiB // 53.99Gib 의 볼륨 그룹이 생성 된 것을 확인 할 수 있습니다.
  PE Size               4.00 MiB
  Total PE              13821
  Alloc PE / Size       0 / 0
  Free  PE / Size       13821 / <53.99 GiB
  VG UUID               1sFJs6-KcG1-REXO-t3XB-gbBL-JlPL-pD1nUm
확인이 완료 되셨으면 이제 logical Volume을 만들어 주면 됩니다.
아래와 같이 100%의 tedLV 를 만든 것을 알 수 있습니다.
# lvcreate --extents 100%FREE -n tedLV tedVG
  Logical volume "tedLV" created.
이제 fdisk 로 다시 확인해 보겠습니다.
아래와 같이 logical volum을 확인 할 수있습니다.

이제 파티셔닝 과정이 끝났으니 포멧하고 마운트 작업을 하여 사용해 보도록 하겠습니다.
# mkfs.ext4 /dev/mapper/tedVG-tedLV
mke2fs 1.45.5 (07-Jan-2020)
Discarding device blocks: done
Creating filesystem with 14152704 4k blocks and 3538944 inodes
Filesystem UUID: 5e29338f-0960-4e0b-a355-6c8ef919348d
Superblock backups stored on blocks:
	32768, 98304, 163840, 229376, 294912, 819200, 884736, 1605632, 2654208,
	4096000, 7962624, 11239424

Allocating group tables: done
Writing inode tables: done
Creating journal (65536 blocks): done
Writing superblocks and filesystem accounting information:
done
blkid로 확인해 보면 UUID 값이 생성 된 것을 볼 수 있습니다.
그럼 이제 마운트 해서 디스크 사용 가능 한지 확인해 보겠습니다.
# blkid

/dev/mapper/tedVG-tedLV: UUID="5e29338f-0960-4e0b-a355-6c8ef919348d" TYPE="ext4"
# mount /dev/mapper/tedVG-tedLV /backup
# df -h
Filesystem Size Used Avail Use% Mounted on
udev 3.9G 0 3.9G 0% /dev
tmpfs 796M 1.1M 795M 1% /run
/dev/sda4 69G 8.3G 57G 13% /
tmpfs 3.9G 0 3.9G 0% /dev/shm
tmpfs 5.0M 0 5.0M 0% /run/lock
tmpfs 3.9G 0 3.9G 0% /sys/fs/cgroup
/dev/sda3 2.0G 205M 1.6G 12% /boot
/dev/loop0 62M 62M 0 100% /snap/core20/1611
/dev/loop1 68M 68M 0 100% /snap/lxd/22753
/dev/loop3 48M 48M 0 100% /snap/snapd/17336
/dev/loop4 64M 64M 0 100% /snap/core20/1695
/dev/loop5 50M 50M 0 100% /snap/snapd/17576
tmpfs 796M 0 796M 0% /run/user/1000
tmpfs 796M 0 796M 0% /run/user/0
/dev/mapper/tedVG-tedLV 53G 24K 51G 1% /backup51G /backup 디렉토리를 사용할 수 있습니다.
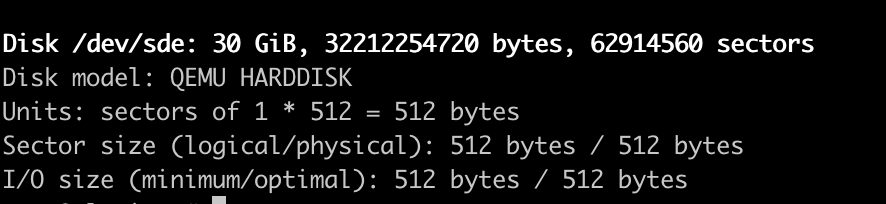
이제 그럼 여기서 디스크 하나를 더 추가 한다는 가정에 작업을 하겠습니다.
30Gb 짜리 디스크를 하나 더 만들고 나서 다음 작업을 살펴 보겠습니다.
위에서 했던 작업을 반복해야 합니다.
파티셔닝을 LVM으로 만들어 주고, Physical volume 볼륨 생성 작업까지 해줍니다.
pvdisplay로 확인해 보면 /dev/sde1 가 추가 된 것을 확인할 수 있습니다.
# pvdisplay
  --- Physical volume ---
  PV Name               /dev/sdd1
  VG Name               tedVG
  PV Size               <20.00 GiB / not usable 3.00 MiB
  Allocatable           yes (but full)
  PE Size               4.00 MiB
  Total PE              5119
  Free PE               0
  Allocated PE          5119
  PV UUID               9rLVth-EeMv-WjnG-2ndn-412x-EVHy-7S4ciP

  --- Physical volume ---
  PV Name               /dev/sdc1
  VG Name               tedVG
  PV Size               <12.00 GiB / not usable 3.00 MiB
  Allocatable           yes (but full)
  PE Size               4.00 MiB
  Total PE              3071
  Free PE               0
  Allocated PE          3071
  PV UUID               jb8jt6-rsXb-Cupc-B6vO-0M14-DGbz-CxH0ZX

  --- Physical volume ---
  PV Name               /dev/sdb1
  VG Name               tedVG
  PV Size               <22.00 GiB / not usable 3.00 MiB
  Allocatable           yes (but full)
  PE Size               4.00 MiB
  Total PE              5631
  Free PE               0
  Allocated PE          5631
  PV UUID               EruqKa-nJJw-Eh4J-1MUQ-tIIX-fR9a-tUa8es

  "/dev/sde1" is a new physical volume of "<30.00 GiB"
  --- NEW Physical volume ---
  PV Name               /dev/sde1
  VG Name
  PV Size               <30.00 GiB
  Allocatable           NO
  PE Size               0
  Total PE              0
  Free PE               0
  Allocated PE          0
  PV UUID               ZFjHPJ-RG9g-1PE6-0qXt-kSA5-vd7S-AaKtkd
이제 여기서 부터 조금 다른 명령어를 사용하게 됩니다
기존에 만들었던 tedVG 에 추가하는 것 입니다.
# vgextend tedVG /dev/sde1
  Volume group "tedVG" successfully extended

# vgdisplay
  --- Volume group ---
  VG Name               tedVG
  System ID
  Format                lvm2
  Metadata Areas        4
  Metadata Sequence No  12
  VG Access             read/write
  VG Status             resizable
  MAX LV                0
  Cur LV                1
  Open LV               1
  Max PV                0
  Cur PV                4
  Act PV                4
  VG Size               83.98 GiB
  PE Size               4.00 MiB
  Total PE              21500
  Alloc PE / Size       13821 / <53.99 GiB
  Free  PE / Size       7679 / <30.00 GiB
  VG UUID               1sFJs6-KcG1-REXO-t3XB-gbBL-JlPL-pD1nUm
이제 free PE / Size 가 변경 된 사항을 확인 할 수있습니다.
이제 logical volum에 추가 하셔야 합니다.
# lvextend /dev/tedVG/tedLV -l +7679
  Size of logical volume tedVG/tedLV changed from <53.99 GiB (13821 extents) to 83.98 GiB (21500 extents).
  Logical volume tedVG/tedLV successfully resized
다시 vgdisplay 를 확인해 보면 Free/PE 값이 변경 된 것을 확인 할 수 있습니다.
하지만 아직까지도 mount 에서는 /dev/mapper/tedVG-tedLV 53G 24K 51G 1% /backup 로 보일 것입니다.
# vgdisplay
  --- Volume group ---
  VG Name               tedVG
  System ID
  Format                lvm2
  Metadata Areas        4
  Metadata Sequence No  13
  VG Access             read/write
  VG Status             resizable
  MAX LV                0
  Cur LV                1
  Open LV               1
  Max PV                0
  Cur PV                4
  Act PV                4
  VG Size               83.98 GiB
  PE Size               4.00 MiB
  Total PE              21500
  Alloc PE / Size       21500 / 83.98 GiB
  Free  PE / Size       0 / 0
  VG UUID               1sFJs6-KcG1-REXO-t3XB-gbBL-JlPL-pD1nUm
디스크 리사이즈를 통하여 변경된 모든 디스크 할당량을 사용해 보도록 하겠습니다.
# resize2fs /dev/mapper/tedVG-tedLV
resize2fs 1.45.5 (07-Jan-2020)
Filesystem at /dev/mapper/tedVG-tedLV is mounted on /backup; on-line resizing required
old_desc_blocks = 7, new_desc_blocks = 11
The filesystem on /dev/mapper/tedVG-tedLV is now 22016000 (4k) blocks long.

# df -h
Filesystem               Size  Used Avail Use% Mounted on
udev                     3.9G     0  3.9G   0% /dev
tmpfs                    796M  1.1M  795M   1% /run
/dev/sda4                 69G  8.3G   57G  13% /
tmpfs                    3.9G     0  3.9G   0% /dev/shm
tmpfs                    5.0M     0  5.0M   0% /run/lock
tmpfs                    3.9G     0  3.9G   0% /sys/fs/cgroup
/dev/sda3                2.0G  205M  1.6G  12% /boot
/dev/loop2                68M   68M     0 100% /snap/lxd/22753
/dev/loop0                62M   62M     0 100% /snap/core20/1611
/dev/loop1                64M   64M     0 100% /snap/core20/1695
/dev/loop3                48M   48M     0 100% /snap/snapd/17336
/dev/loop4                50M   50M     0 100% /snap/snapd/17576
tmpfs                    796M     0  796M   0% /run/user/0
/dev/mapper/tedVG-tedLV   83G   24K   79G   1% /backup
디스크가 83G 로 변경 된 것을 확인 하실수 있습니다.
잘 안되시거나 궁금한 사항 댓글 남겨주시면 답변 드리겠습니다.
'서버인프라' 카테고리의 다른 글
| Jenkins 설치 (0) | 2022.11.28 |
|---|---|
| PowerDNS Recursor & Dnsdist (2) | 2022.11.23 |
| [Ncloud] [compute][Server] Professional OverView (0) | 2022.11.16 |
| Rocket Chat 설치 (0) | 2022.11.14 |
| GitLab 설치 (0) | 2022.11.11 |


댓글