구성해 보기
오늘 해보려고 하는 구성이 대략 이런거에요
우선 기존에는 구성했던 kafka를 보면
1대의 서버에 kafka와 zookeeper가 같이 실행 되고 있는 형태 이죠~

여기에 schemaregistory 와 connector 를 설정해서 연결해 볼 예정입니다.
그리고 mariadb를 설치하여 전송된 메시지를 바로 DB에 insert해 보도록 하겠습니다.
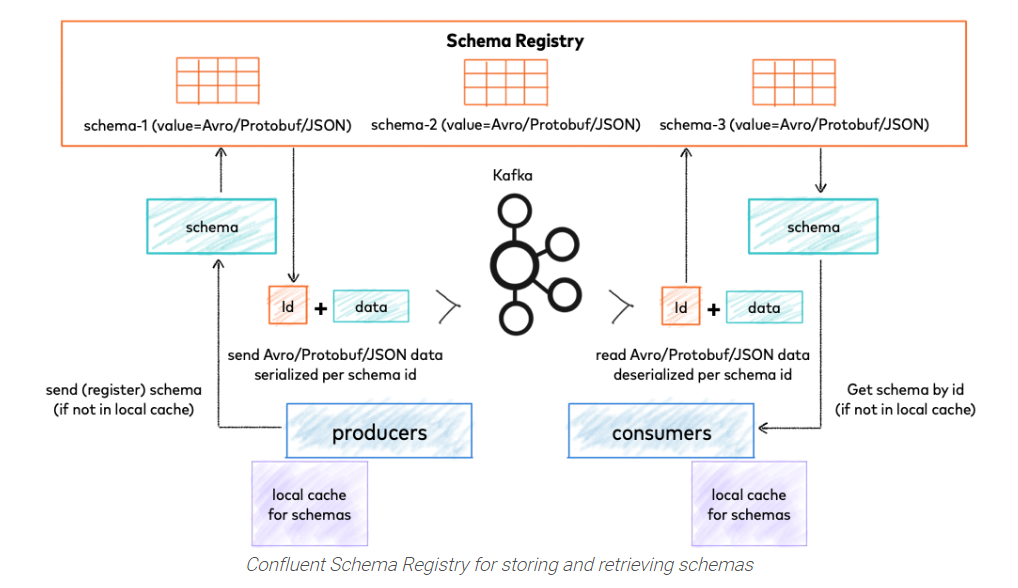
1. SCHEMA REGISTRY 세팅
vi /etc/schema-registry/schema-registry.properties

############################## 수정 사항 ################################
listeners=http://0.0.0.0:8081
kafkastore.connection.url=192.168.2.77:2181,192.168.2.78:2181,192.168.2.79:2181/kafka

kafkastore.topic=_schemas
kafkastore.topic.replication.factor=3
위에 처럼 변경하여 주시고, schema registry 를 실행 합니다.
/usr/bin/schema-registry-start /etc/schema-registry/schema-registry.properties

### 위에처럼 실행 하여 주시거나

### 아래와 같이 실행 해 주시면 됩니다.
systemctl start confluent-schema-registry.service
tcp6       0      0 :::8081                 :::*                    LISTEN      19539/java
tcp6       0      0 :::43002                :::*                    LISTEN      19539/java
정상적으로 실행 되었다면 아위와 같이 8081 포트가 실행 된 모습을 확인 하실 수 있습니다.
이제 kafka-connect-jdbc 를 셋팅해 보겠습니다.
2. KAFKA-CONNECT-JDBC 셋팅
kafka connect properties 셋팅
name=sink_mysql_test
connector.class=io.confluent.connect.jdbc.JdbcSinkConnector
tasks.max=1
connection.url=jdbc:mysql://192.168.2.140:3306/TEST
connection.user=test
connection.password=12341234
auto.create=true
connect-avro-standalone.properties 수정
vi /etc/schema-registry/connect-avro-standalone.properties

bootstrap.servers=192.168.2.77:9092,192.168.2.78:9092,192.168.2.79:9092
key.converter=io.confluent.connect.avro.AvroConverter
key.converter.schema.registry.url=http://localhost:8081
value.converter=io.confluent.connect.avro.AvroConverter
value.converter.schema.registry.url=http://localhost:8081
internal.key.converter=org.apache.kafka.connect.json.JsonConverter
internal.value.converter=org.apache.kafka.connect.json.JsonConverter
internal.key.converter.schemas.enable=false
internal.value.converter.schemas.enable=false
offset.storage.file.filename=/tmp/connect.offsets
kafkastore.topic.replication.factor=3
plugin.path=/usr/share/java
kafka standalone 실행
/usr/bin/connect-standalone /etc/schema-registry/connect-avro-standalone.properties /etc/kafka-connect-jdbc/TEST.properties위와 같이 실행 하면 TCP 8083이 올라 옵니다.
tcp6 0 0 :::8083 :::* LISTEN 25491/java
여기까지 완료 되셨다면 avro connector 을 사용하기 위한 준비를 마쳤습니다.
자그럼 테스트 해보겠습니다. 테스트를 위해 python3 설치를 하고 아래와 같이
vi 편집기를 열어서 test.py 파일로 작성해 주세요
#!/usr/bin/python3
from confluent_kafka import avro
from confluent_kafka.avro import AvroProducer
import time

start = time.time()

# Avro 스키마 정의
value_schema_str = """
{
    "type" : "record",
    "name" : "myrecord",
    "fields" :
    [
       {"name" : "id", "type" : "int"},
       {"name" : "name", "type" : "string"},
       {"name" : "email", "type" : "string"}
    ]
}
"""

value_schema = avro.loads(value_schema_str)

# AvroProducer 초기화
avroProducer = AvroProducer({
    'bootstrap.servers': 'broker1:9092,broker2:9092,broker3:9092',
    'schema.registry.url': 'http://connector:8081'
}, default_value_schema=value_schema)

# 데이터 produce
for i in range(1, 10000):
    value = {"id": i, "name": "foo" + str(i), "email": "test" + str(i) + "@test.com"}
    avroProducer.produce(topic='member', value=value)
    if i % 100000 == 0:
        avroProducer.flush()

avroProducer.flush()
print("time:", time.time() - start)
자 그리고~ 실행!!!
python3 test.py그럼 DB에 잘 데이터가 들어갔는지 확인해 보겠습니다.

잘들어가는거 보이시죠?
그리고, topic 확인도 필요하니....
/bin/kafka-consumer-groups --bootstrap-server kafka1.test.com:9092 kafka2.test.com:9093 kafka3.test.com:9094 --group connect-sink_mysql_test --topic 토픽명 --reset-offsets --to-latest --execute
처음 AVRO를 쓰려고 테스트 하고 있을때 KAFKA에대한 이해도도 없어서 꽤 많은 고생을 했던거로 기억합니다.
많은 에러가 날지 모르지만... 그래도 끝까지 도전해 보세요
팁!! 혹시 example-topic이 살아 있으면 avro 실행시 아무 반응이 없을 수 있습니다. 이럴때는 기존 생성했던 topic 삭제후 /usr/bin/connect-standalone /etc/schema-registry/connect-avro-standalone.properties /etc/kafka-connect-jdbc/sink-quickstart-mysql-UNION_MINING.properties 다시 실행해 주세요. 이후 위 파이썬 스크립트를 실행해 보세요. 해결 될 겁니다.
'서버인프라 > 카프카' 카테고리의 다른 글
| [ 제3-1강 소비와 생산 ] KAFKA Producer & Consumer (0) | 2021.02.02 |
|---|---|
| [ 제 3강 소비와 생산 ] KAFKA Producer & Consumer (0) | 2021.02.01 |
| [ 제 2강 설치 ] KAFKA TOPIC 생성 (0) | 2021.02.01 |
| [ 제 1강 설치 ] zookeeper 와 KAFKA 설치하기 (0) | 2021.01.26 |
| APACHE KAFKA 이야기 (0) | 2021.01.25 |


댓글